On this page
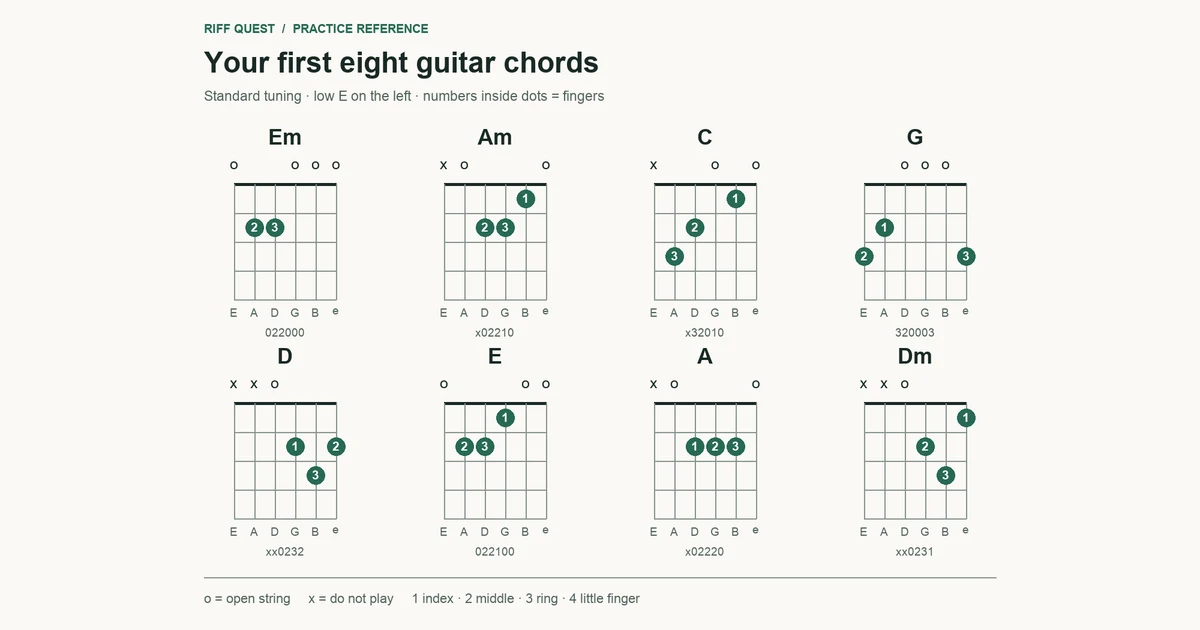
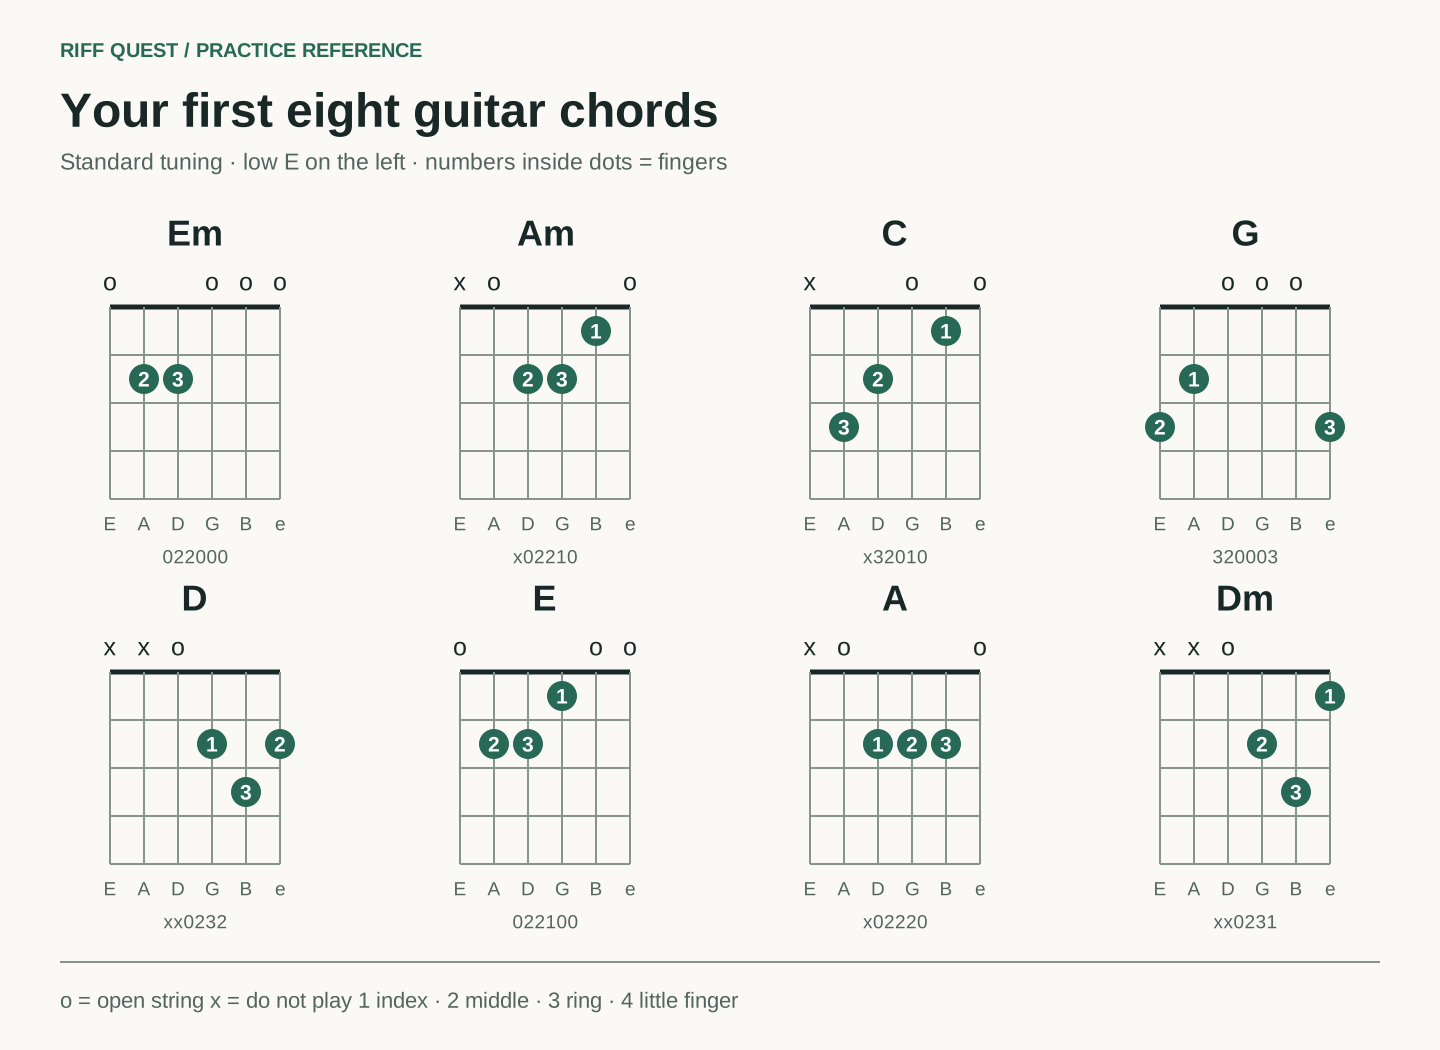
Start with Em and Am, check that each string rings clearly, and practice moving between the two shapes. Then add C, G, D, E, A and Dm as you need them. These eight open guitar chords give you a useful starting vocabulary for rhythm guitar.
This guide includes diagrams, exact finger positions, short exercises and a ten-minute routine. Keep it open beside your guitar: you can play the first exercise before reading the whole page.
Riff Quest helps you organize that work and keep a record of your practice. Based on the Riff Quest team's observations of activity on the platform, chord-related exercises are among the most frequently practiced activities in Riff Quest. That is a practical reason to give chord changes and rhythm their own place in your routine. It is an observation about our community, not a claim that one exercise works best for every guitarist.
This guide is published by Riff Quest and includes links to our own practice tools.
Choose your starting point:
- Find a chord shape
- Learn to read the diagrams
- Fix unclear chords
- Practice chord changes
- Start the ten-minute plan
- Log the session in Riff Quest
What is a guitar chord?
A chord is a combination of notes heard together. The major and minor chords in this guide each contain three different note names, although some notes repeat across the strings. For example, an E minor chord contains E, G and B; its open shape uses all six strings.
An open chord includes at least one string played without fretting it. A chord shape is the arrangement of fingers used to play a particular version of a chord. The same chord can have several shapes in different positions on the neck.
You will see major chords written as a letter, such as C or D. A lowercase m means minor: Am is A minor, and Em is E minor. The difference comes from the notes inside the chord, not from how hard you strum.
For this lesson, use standard tuning and no capo. The shapes work on both acoustic and electric guitars.
How to read a guitar chord diagram
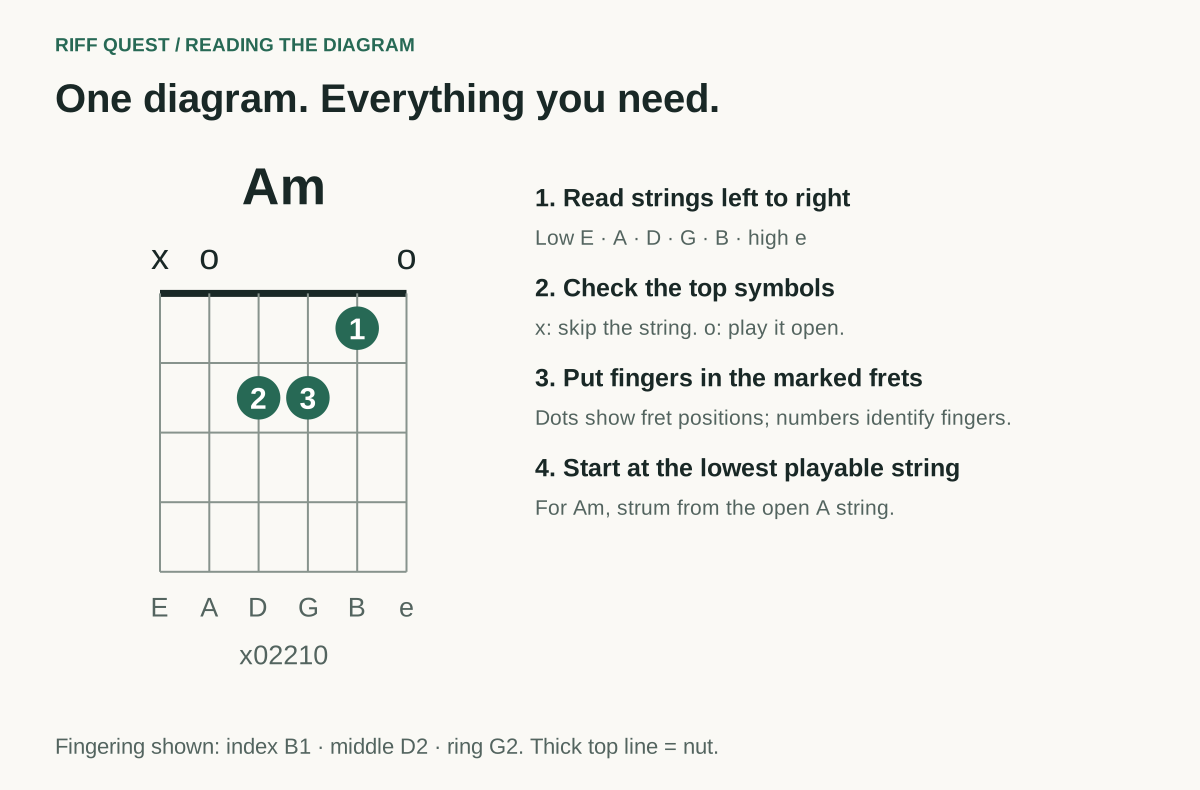
Imagine the guitar standing upright, with its headstock above the diagram.
From left to right: low E, A, D, G, B and high e. Low E is string 6; high e is string 1.
The thick line at the top is the nut. A dot in the first space means fret 1; the next space means fret 2.
1 is your index finger, 2 your middle finger, 3 your ring finger and 4 your little finger.
You pick or strum them without pressing a fret.
Start your strum on the lowest string that belongs in the chord.
The compact code under a diagram follows the same string order. For example, Am = x02210 means skip low E, play A open, fret D at 2, G at 2 and B at 1, then play high e open. These six characters describe one chord; they are not a sequence of notes to play in time.
Alternative fingerings are possible. Use the fingerings shown here while following this guide so that the movement instructions match the diagrams. If you play left-handed, keep using the printed string names to orient yourself; these diagrams are not mirrored photographs of your hand.
Eight open guitar chords
Keep this table nearby while practicing. “Lowest string” tells you where to begin a downward strum.
| Chord | Fingering code, low E to high e | Lowest string | Notes in the chord |
|---|---|---|---|
| Em — E minor | 022000 | Low E, string 6 | E, G, B |
| Am — A minor | x02210 | A, string 5 | A, C, E |
| C — C major | x32010 | A, string 5 | C, E, G |
| G — G major | 320003 | Low E, string 6 | G, B, D |
| D — D major | xx0232 | D, string 4 | D, F♯, A |
| E — E major | 022100 | Low E, string 6 | E, G♯, B |
| A — A major | x02220 | A, string 5 | A, C♯, E |
| Dm — D minor | xx0231 | D, string 4 | D, F, A |
You do not need to memorize all eight today. Start with two, then introduce another when you can form the first pair without rebuilding the shapes from the diagram every time.
Em: your first six-string chord
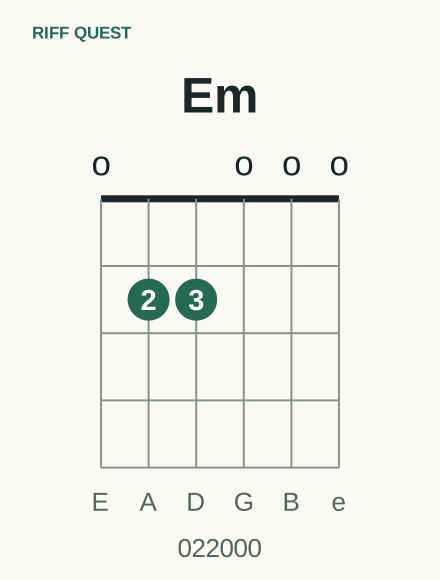
- Middle finger
- string 5, fret 2
- Ring finger
- string 4, fret 2
- Open strings
- 6, 3, 2 and 1
- Strum from
- low E, string 6 — all six strings ring
Listen for the open G string ringing clearly. Your ring finger can accidentally lean against it.
Try this pick each string separately from low E to high e, then play four gentle downstrokes. Release the shape, relax your hand and build it again. Repeat three times.
Am: your first five-string chord
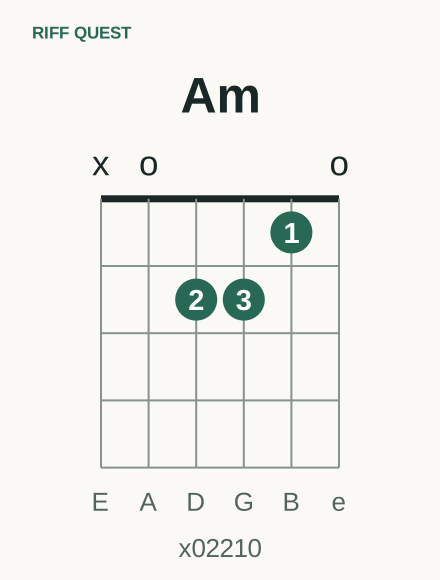
- Index finger
- string 2, fret 1
- Middle finger
- string 4, fret 2
- Ring finger
- string 3, fret 2
- Open strings
- 5 and 1
- Strum from
- the open A string, string 5 — skip string 6
Listen for the open high e string. If it is muted, adjust the angle of your index finger so it clears that string.
Try this start your pick on the A string and move across the five playable strings. Rehearse starting in the correct place before adding a faster strum.
C: a useful next step from Am
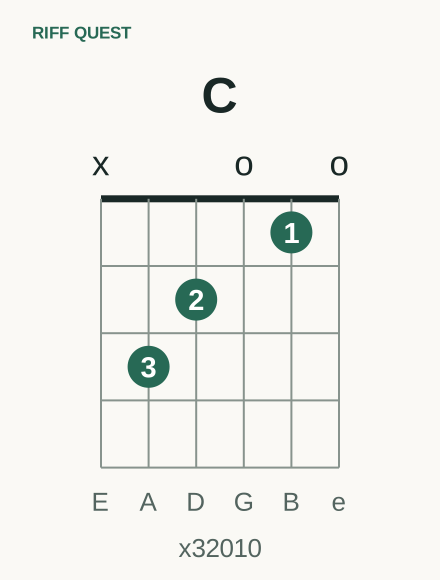
- Ring finger
- string 5, fret 3
- Middle finger
- string 4, fret 2
- Index finger
- string 2, fret 1
- Open strings
- 3 and 1
- Strum from
- the open A string, string 5 — skip string 6
Listen for the open G string and high e string. Each should sound without being caught by a neighboring finger.
Try this form Am first. Keep the index and middle fingers in place and move your ring finger from G2 to A3. You have changed Am to C using one moving finger.
G: a wider six-string shape
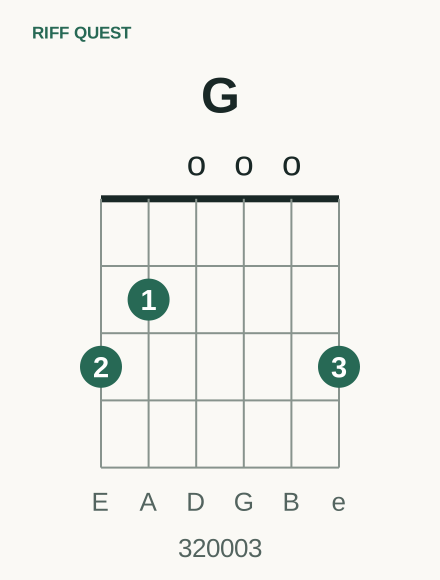
- Middle finger
- string 6, fret 3
- Index finger
- string 5, fret 2
- Ring finger
- string 1, fret 3
- Open strings
- 4, 3 and 2
- Strum from
- low E, string 6 — all six strings ring
Listen for the open D string, which can be muted by the index finger, and the B string next to your ring finger.
Try this build the low-string part first, then place the ring finger. Once the shape is familiar, practice placing all three fingers together. This guide uses the three-finger version of G consistently; other versions are also valid.
D: aim for four strings
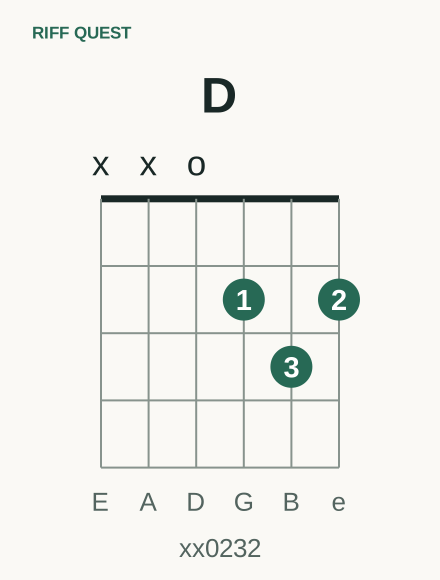
- Index finger
- string 3, fret 2
- Ring finger
- string 2, fret 3
- Middle finger
- string 1, fret 2
- Open string
- 4
- Strum from
- the open D string, string 4 — skip strings 6 and 5
Listen for the high e string. The ring finger on B3 may touch it if your fingers flatten.
Try this pick D, G, B and high e separately. Then make a small downstroke across those same four strings. The picking hand has a target as well as the fretting hand.
E: hear the difference from Em
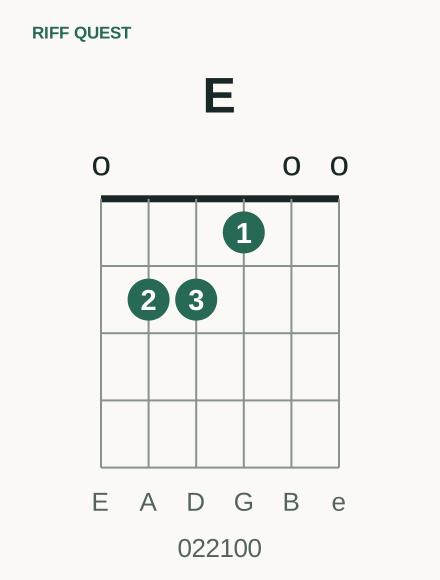
- Middle finger
- string 5, fret 2 — the Em position
- Ring finger
- string 4, fret 2 — the Em position
- Index finger
- string 3, fret 1 — the note Em does not have
- Open strings
- 6, 2 and 1
- Strum from
- low E, string 6 — all six strings ring
Listen for how the sound changes when the open G becomes G♯. This is the note that changes E minor into E major.
Try this alternate Em and E slowly, moving only the index finger. Listen to the change in sound before increasing speed.
A: fit three fingers into one fret
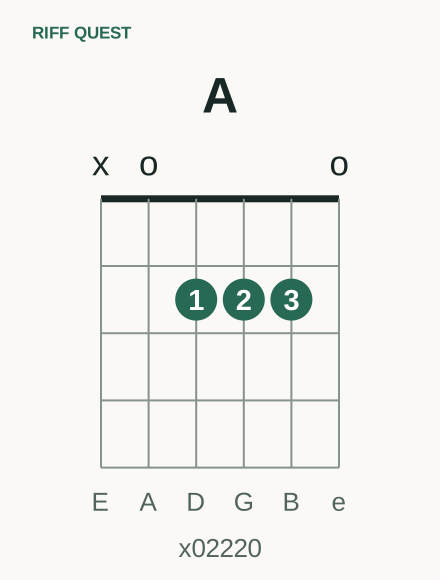
- Index finger
- string 4, fret 2
- Middle finger
- string 3, fret 2
- Ring finger
- string 2, fret 2
- Open strings
- 5 and 1
- Strum from
- the open A string, string 5 — skip string 6
Listen for all three fretted notes and the open high e. The fingers have limited space, so make small adjustments rather than squeezing harder.
Try this pick the three fretted strings individually, then add the open A and high e. If this fingering feels crowded, another A fingering may suit your hand better; use one consistently while learning a particular transition.
Dm: change one note, reshape the fingers
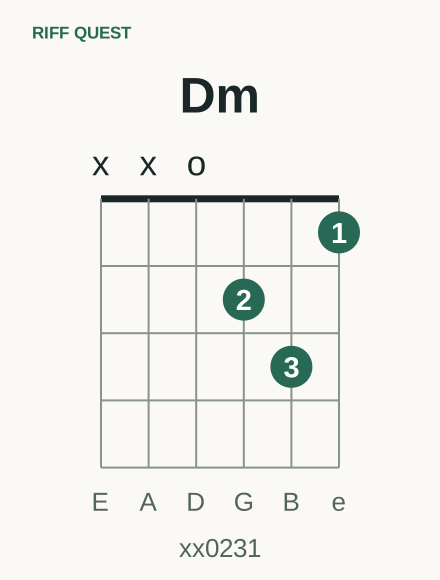
- Middle finger
- string 3, fret 2
- Ring finger
- string 2, fret 3
- Index finger
- string 1, fret 1
- Open string
- 4
- Strum from
- the open D string, string 4 — skip strings 6 and 5
Listen for the high e string at fret 1. It should sound clearly without forcing your wrist into an uncomfortable angle.
Try this compare D with Dm. The highest note moves from F♯ to F, but the suggested fingering also changes. Rebuild the shape slowly instead of trying to slide the whole D shape down.
Make each chord sound clear
Use this check whenever a new chord sounds wrong:
Check fret numbers, fingers and omitted strings.
Find the specific string causing the problem.
Move a fingertip closer to the fret wire toward the body of the guitar, or change its angle so it clears a neighboring string.
Use enough pressure for the note to speak clearly; extra tension makes transitions harder.
This lets you hear the result of the adjustment.
| What you hear | What to check first |
|---|---|
| A dull click instead of a note | A finger may be touching a string that should ring |
| A buzzing fretted note | Finger position within the fret and sufficient pressure |
| A clean chord with the wrong bass note | Whether the strum starts on the correct string |
| A pause when changing chords | Whether you need a slower tempo or a simpler two-chord drill |
| Problems across several shapes | Tuning and guitar setup, as well as finger placement |
If playing hurts, stop and adjust rather than pushing through. A teacher can help check your hand position; a guitar technician can check an instrument that is unusually difficult to fret.
Our beginner guitar exercises include drills for strumming and for controlling which strings sound. Use them alongside the chord checks above — the muting drill below is the same string-by-string check applied to one chord.
Muting — Inside a D Chord
Strike a three-string D major triad while selectively muting specific strings with your fretting hand.
Practice your first chord changes
A transition needs its own practice. Being able to hold two shapes does not automatically mean you can move between them in time.
Start with Em to Am
Check the strings one at a time.
Only enough to move comfortably.
The middle finger from A2 to D2, the ring finger from D2 to G2.
On B1, which completes Am.
Then return to Em and start from low E again.
Work without a metronome at first. Notice that the starting string changes along with the fretting-hand shape.
Practice Am to C with two fingers staying in place
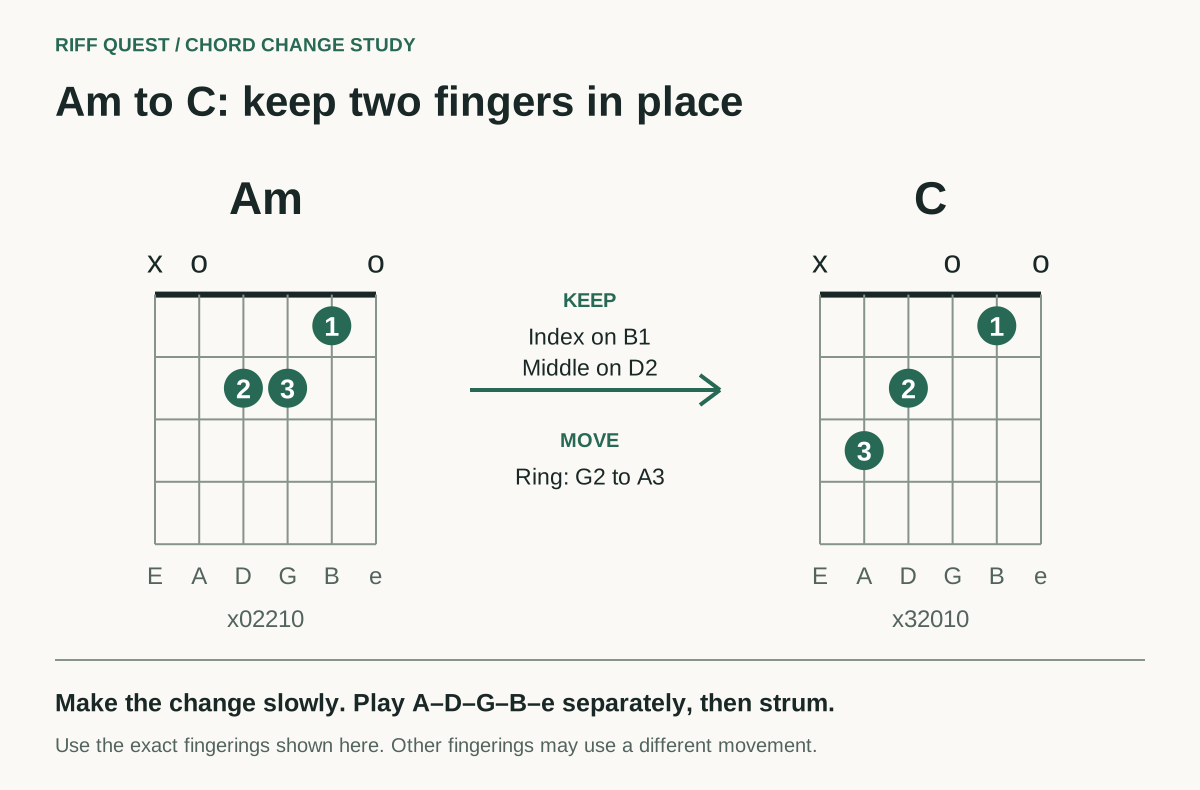
With the fingerings in this guide, your index stays on B1 and your middle stays on D2. Move only the ring finger between G2 and A3. Keep the fingers that stay in place relaxed; they do not need to clamp down harder.
Repeat the movement slowly five times. Then pick the five playable strings in each chord. A smaller movement is useful only if the new shape still sounds clear.
Put the change on a beat
Choose a slow tempo you can follow; 40–60 BPM is a suggested starting range, not a required level. Count “1, 2, 3, 4.” Play Am on beat 1, let it ring, and change to C on the next beat 1. Repeat.
Once that works, add a downstroke on each beat. Keep the rhythm steady through the transition. If the change repeatedly arrives late, slow the exercise or return to one strum per bar.
Try four bars without a noticeable stop. This is a checkpoint for this lesson, not a universal test of whether you have mastered a chord. When it feels controlled, add a few BPM and repeat. If clarity disappears, return to the previous tempo.
An optional one-minute check
Set a timer for one minute and alternate between one pair of chords. Count one change each time you arrive at the next chord and strum it clearly. Am → C → Am counts as two changes; the starting Am does not count.
Write down the pair, the fingerings used and the number of clean changes. Compare later attempts under the same conditions. This measures one narrow skill; it does not replace playing in rhythm or listening carefully.
Your ten-minute chord practice plan
Choose Am and C for this example, or substitute a pair you are currently learning.
| Time | Task | Exactly what to do | Listen for |
|---|---|---|---|
| 0:00–2:00 | Check both shapes | Pick each playable string in Am, then C. Adjust one unclear note at a time. | Clear intended notes; low E omitted |
| 2:00–5:00 | Rehearse the change | Keep index and middle in place. Move the ring finger slowly between G2 and A3. | Both shapes complete before strumming |
| 5:00–8:00 | Add rhythm | Use one downstroke per beat. Change after four beats. Lower the tempo if needed. | An even pulse at the change |
| 8:00–10:00 | Play a progression | Repeat Am | C | Am | C, one bar per chord in 4/4. | The same rhythm through every bar |
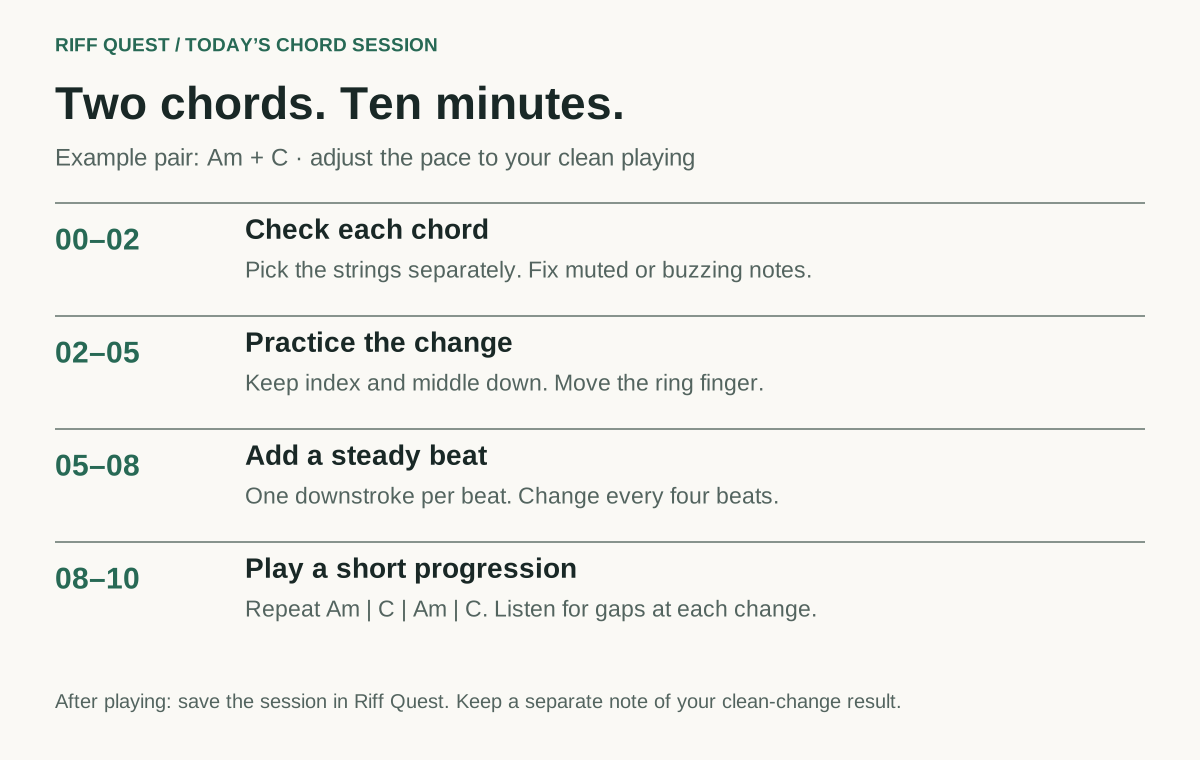
The progression is an original practice example, not a transcription of a particular song. You can stay with it across several sessions. When it becomes comfortable, work on another pair such as G–D instead of adding difficulty everywhere at once.
After the ten minutes, save your practice session. If you use the optional one-minute check, do it separately and include that extra minute in your actual practice time.
Use Riff Quest to organize and log your practice
Treat today's task as a specific session: two chord shapes, one transition and a short rhythm exercise.
- Choose the material. Keep this routine open, or pick a drill from the beginner guitar exercises.
- Set up your blocks. Riff Quest supports practice plans with selected exercises and durations. Use the four blocks above as a reference when arranging your session.
- Play the session. Focus on the strings and transitions, using the diagrams when needed.
- Record the work. Use the app's practice timer or enter the time afterward. The practice FAQ explains both routes.
- Review and repeat. Use your practice history to see whether you are returning to the exercise. Choose one thing to improve next time.
The app's record of practice time and your assessment of musical quality answer different questions. Keep a separate note of clean-change counts or tempo if you want those measurements. Do not interpret time logged or points earned as proof that every chord sounded correct.
You do not need a microphone or audio interface to log a session. Optional note detection is a separate feature; the exercises in this article use your own listening to check full chords.
Start practicing with Riff Quest
Choose your exercise, play a short session and save the work you did. Riff Quest is free and you can log practice with nothing but a timer.
Start practicingPut the chords into music
Once a pair feels comfortable, try the shapes inside a short progression. For example:
G | D | Em | C
Play one bar per chord in 4/4. Start with a single downstroke on beat 1. Then try four downstrokes per bar. Listen to the transitions as well as each individual chord.
This is another general practice progression, not a claim that a particular song uses exactly these shapes or this arrangement. When you choose a song from the Riff Quest song library, check its tuning, capo position, chord versions and hardest section. A song can use familiar chords and still have a demanding rhythm.
Work on a short section you can repeat, then use the same practice loop: check the shape, isolate the change, add rhythm and save the session.
FAQs
Which guitar chords should I learn first?
Em and Am are a practical first pair for this guide. Add C next to practice a transition with two fingers staying in place. The other shapes here extend your options. There is no single learning order that fits every hand or every song.
How many chords should I practice in one session?
Two are enough for a focused beginner session. Spend time checking the notes and moving between the shapes. Add another when you can give it attention without losing the clarity of the first pair.
How long does it take to change chords smoothly?
It varies with the chord pair, fingering, tempo and your starting point. Compare the same short exercise over several sessions. Look for clearer notes and fewer pauses rather than expecting a fixed completion date.
Should I learn barre chords now?
You can begin with the open shapes here. Barre chords become useful when the music you want to play calls for them. They are not a prerequisite for completing this routine.
Do these shapes work on electric guitar?
Yes. In standard tuning, the fret positions are the same on acoustic and electric guitars. A clear, relatively unprocessed sound makes it easier to hear whether individual strings are ringing.
Can I use Riff Quest if I practice away from my computer?
Yes. You can record your practice afterward. Keep enough detail to enter the time accurately, and check the app's current logging options when saving it.
Does Riff Quest automatically count my clean chord changes?
This guide uses a manual count. Time logging and optional note detection should not be treated as an automatic chord-change assessment. Count the clean transitions yourself if you use the one-minute exercise.
Are these fingerings the only correct ones?
No. Several chords have common alternative fingerings. The versions here keep the diagrams and transition instructions consistent. A different fingering may suit a particular song or the next chord better.
Start with one pair today
Choose Em–Am or Am–C. Check each chord string by string, practice the change slowly and add a steady beat. Ten focused minutes gives you a manageable session to return to.
Build your practice habit with Riff Quest
Log today's session, then come back to the same pair and listen for what feels more controlled.
Log your first sessionFurther learning
- Beginner guitar practice routine and checklist: where chords sit inside a full daily session.
- Guitar practice routine for beginners: the four-block structure this ten-minute plan is a short version of.
- JustinGuitar's beginner course: a structured route through beginner chord and rhythm skills.
- JustinGuitar's guitar basics: introductory lessons on chord boxes, tuning and finger placement.
About the Author

Michael Apfel
Guitarist & Creator of Riff Quest
Has been playing guitar for 14 years, including time performing live in two bands. Built Riff Quest to solve his own practice-tracking problems, and writes about practice and learning guitar drawing on hands-on experience with the instrument.
Try Riff Quest