How to Learn Guitar Songs Faster: 6 Proven Methods
Learning guitar songs doesn’t have to be frustrating. With the right approach, you can make steady progress without feeling overwhelmed. Here’s how:
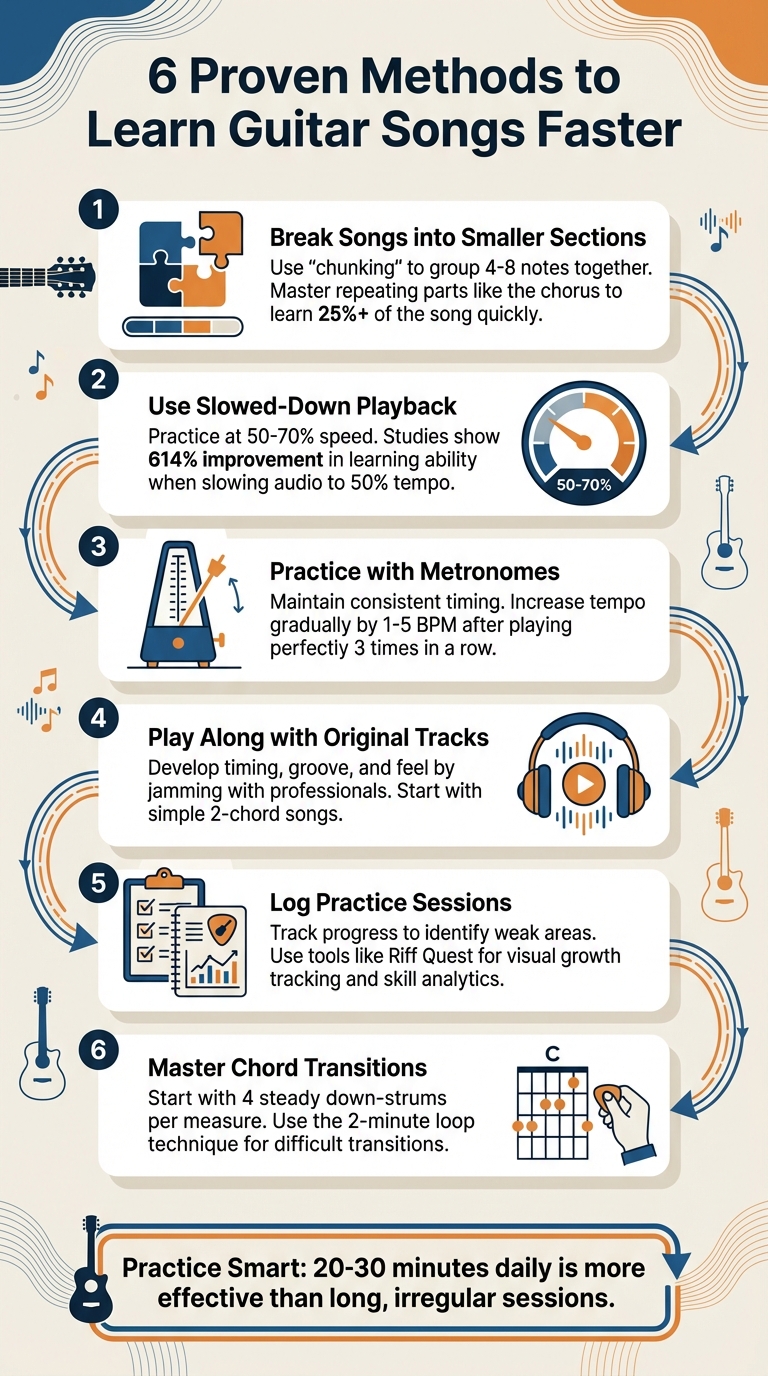
- Break songs into smaller sections: Focus on specific parts like the chorus or intro to simplify learning.
- Slow down playback: Practice at 50–70% speed to improve accuracy before increasing tempo.
- Use tools like metronomes and audio apps: Maintain timing and isolate tricky sections with precision.
- Play along with original tracks: This helps you develop timing and feel while practicing.
- Log practice sessions: Track your progress to identify areas needing improvement.
- Master chord transitions and simple strumming: Build muscle memory by practicing smooth changes and steady rhythms.
Small, consistent practice sessions (20–30 minutes daily) are more effective than long, irregular ones. Combine these methods with tools like Riff Quest to structure your practice and measure growth. By focusing on these strategies, you’ll learn songs faster and play with confidence.
How I Learned 50 New Songs In 5 Days - My 9-Step System For Learning Songs On Guitar FAST
Break Songs into Smaller Sections
Learning a song start to finish in one go can feel overwhelming. When you try to tackle every note at once, it’s like overloading your brain with too much information. Instead, break the song into smaller, manageable sections. This method, often called "chunking", involves grouping 4–8 notes together, making them easier to remember.
The benefits show up quickly. By focusing on repetitive parts of the song - like the chorus or a recurring riff - you can master 25% or more of the track in just a day or two. That early progress boosts your confidence and keeps you motivated to work through the trickier parts. As one expert explains:
"Sectional practice is far more effective than trying to tackle the whole song at once"
This approach helps you zero in on the song’s repeating patterns, setting you up for success.
Identify Song Sections
Before you even pick up your instrument, take time to listen to the track multiple times and map out its structure. Use a notepad or a digital app to jot down the distinct parts: Intro, Verse, Chorus, Bridge, Solo, and Outro. If you have a lyric sheet, use it to mark where each section begins and ends. This simple step gives you a clear roadmap of the song and highlights the sections that repeat.
Once the structure is mapped, focus on the recurring parts. For example, if the chorus appears four times, learning it well the first time means you’ve essentially mastered four sections in one go. Understanding the song’s layout not only simplifies the learning process but also speeds up your progress. Think of it like putting together a puzzle - once you’ve placed the key corner pieces, the rest becomes much easier.
Master Each Section Individually
After identifying the sections, practice each one thoroughly until you’re comfortable. A good guideline is the "Three Times" rule - play a section perfectly three times in a row. If you make a mistake, reset the count and try again. This method ensures that each section is truly ingrained in your muscle memory, strengthening your overall performance.
As you practice, don’t forget to work on transitions between sections. Focus on the last few bars of one section and the first few bars of the next. This ensures smooth transitions, which are especially important for live performances. If you lose your place during a song, well-rehearsed transitions can help you recover without missing a beat. James, Founder of Good Guitarist, captures this idea perfectly:
"Understanding something on paper doesn't mean it's in your fingers yet. This step is where you turn 'I get it' into 'I can play it'"
Use Slowed-Down Playback and Metronomes
When it comes to honing your guitar skills, slowing things down can make all the difference. Practicing at full speed can overwhelm both your fingers and your mind, making it harder to catch subtle techniques like hammer-ons, pull-offs, and slides. Slowing down the audio gives you the chance to notice these details and focus on proper finger placement before speed becomes a factor.
In fact, a survey of nearly 200 guitarists revealed that slowing audio to 50% of its original tempo boosted their learning ability by an average of 614%. Many participants also reported a 2- to 10-fold improvement in learning efficiency. As one expert from study‐guitar.com puts it:
"Speed is a by-product of accuracy. If you want to play guitar faster, learn to play more accurately."
Using a metronome alongside slowed-down playback is another powerful way to improve. A metronome provides a steady pulse, helping you maintain consistent timing - especially when working on tricky chord changes or riffs. Now, let’s look at some tools that make slowing down audio easier.
Tools for Slowing Down Audio
There are several tools available to slow down audio without altering the pitch. Here are a few options:
- Looper.tube: A free online tool that lets you adjust YouTube playback speeds with precision.
- Anytune Pro+: Available for iOS/macOS at $14.99, this app offers features like looping and pitch control.
- Transcribe!: Priced at around $39 for a lifetime license, this desktop software includes pitch retention, spectrum analysis, and customizable keyboard shortcuts.
- Moises.ai: This AI-powered tool separates tracks like vocals, drums, bass, and guitar, allowing you to isolate the guitar part. It offers a free version along with subscription-based advanced features.
- Song Surgeon: Ranging from $79.20 to $149.95, this software includes automatic chord detection and a speed trainer that gradually increases tempo after each loop.
One thing to keep in mind: most of these tools can’t directly import songs from Spotify or Apple Music due to digital rights management (DRM) restrictions. You’ll need unprotected MP3 files or tools that can capture audio streams.
Start Slow and Increase Speed Gradually
Begin practicing at 50–70% of the original speed. This allows you to focus on accuracy without feeling rushed. Once you can play a section perfectly three times in a row, gradually increase the tempo in small increments - 1 to 5 BPM at a time - to maintain precision.
Use a 3–4 click count-in to help you land on the right beat. Counting out loud (e.g., "1 e + a 2 e + a") can sharpen your timing further. If you’re working on 16th notes, set your metronome to click on 16ths instead of just quarter notes to ensure every note is perfectly aligned.
If you hit a plateau at a certain tempo, try briefly increasing the speed before returning to your target pace. This method not only improves accuracy but also builds on the momentum you’ve already developed.
Play Along with Original Tracks
After practicing slowly, playing along with full tracks can take your skills to the next level. It shifts your practice from repetitive drills to a real musical experience, helping you develop timing, groove, and feel - qualities that are tough to master when practicing solo.
As Dan Emery, Founder of NYC Guitar School, explains:
"You're literally jamming with top professionals, locking into their timing, groove, and feel."
This approach also sharpens your ear training, helping you internalize pitch and song structure while encouraging you to trust your ears over tabs, which are often inaccurate. Plus, it teaches performance nuances like vibrato, tone, and expression - details that bring a song to life. If you tend to speed up or slow down during solo practice, playing along with a recording keeps you on track, ensuring consistent timing. To make the most of this method, choosing the right tracks is essential.
Choose the Right Tracks
Pick tracks that match your current skill level. Simplified versions, acoustic renditions, or live performances are great starting points since they often strip away production layers, making the guitar parts easier to follow.
For beginners, NYC Guitar School suggests starting with simple two-chord songs like "I'll Take You There" by The Staple Singers, "Feel Like Makin' Love" by Bad Company, or "What I Got" by Sublime. These tracks allow you to focus on rhythm and timing without being overwhelmed by complex chord progressions.
Another tip: check out amateur fan covers on YouTube. These often provide clear views of hand placement and transitions, making them less intimidating for those just starting out.
Focus on Timing and Strumming
Once you've picked a track, zero in on matching the recording's rhythm and timing. Instead of worrying about every detail, start by getting the rhythm and chord changes right. A helpful technique is the "scratching" method: mute your strings with your fretting hand and strum along to the beat, creating a percussive sound that helps you lock in your rhythm.
When you're comfortable, try strumming only on the first beat of each bar or exactly when the chord changes. If you notice your timing slipping, record your session and listen back to identify problem areas.
Steve Stine from GuitarZoom offers this reminder:
"If you have to keep slowing down and speeding back up when you play a song, you're not going to sound your best... if you speed up and slow down in a jam session, you'll fall out of sync with the other musicians."
Log Practice Sessions with Riff Quest

Fine-tuning your timing with original tracks is just one piece of the puzzle. To truly accelerate your progress, tracking your practice sessions is key. Without a clear record of what you’re working on, it’s easy to lose focus or overlook areas that need improvement. Riff Quest transforms your practice into a structured journey, helping you see exactly where you’re growing and where you might be stuck.
As Riff Quest explains:
"Riff Quest turns your practice sessions into visible growth. Built for guitarists who want to practice smarter."
With over 1,000 guitarists already using it, Riff Quest is entirely free - no hidden fees, no surprises. It’s a tool designed to help anyone serious about improving their guitar skills and mastering songs more efficiently.
Track Time Spent on Each Section
Riff Quest’s practice logs provide detailed insights into how you spend your time. Using tools like frequency charts, activity heatmaps, and "Radar Skill Charts", you can quickly identify which areas need more attention. The activity heatmap, for example, acts as a visual tracker of your consistency, showing your practice habits over months or even years.
Struggling with a tricky bridge section despite hours of effort? The platform’s data can point out where you might need to adjust your approach. Completing a Practice Plan earns you +100 XP, while adding a song to your "Want to Learn" list nets you +50 XP. These small incentives encourage regular practice, helping you build muscle memory without feeling overwhelmed if you miss a day.
Beyond just tracking time, Riff Quest provides tools to help you organize and optimize your practice sessions.
Use Song Library and Guided Routines
Riff Quest’s song library offers community-rated difficulty levels, giving you a realistic sense of how challenging a song might be for players at your skill level. This ensures you’re choosing material that’s appropriate - not too easy, but not so difficult that it becomes frustrating.
The Practice Builder feature creates tailored routines, available in both printable and digital formats, to guide your sessions. Instead of hopping randomly between exercises, you’ll follow structured plans that focus on specific skills, helping you master songs faster. The platform also tracks your progress across various skill areas, offering a clear overview of your strengths and the areas that need more work.
Focus on Chord Transitions and Simple Strumming
Now that you’ve established a structured practice routine, it’s time to tackle one of the trickiest parts of learning guitar: smooth chord transitions. Trying to nail complex strumming patterns while still fumbling through chord changes can be overwhelming. The key? Simplify your approach and focus on building a strong foundation.
As James Stratton from London Guitar Academy explains:
"Rhythm is what makes a song feel right. A perfect chord played off-beat doesn't move people. A simple chord played in the groove? Magic."
The goal here is to develop muscle memory for seamless transitions while keeping a steady rhythm.
Practice Smooth Transitions
Start by identifying the chord changes that give you the most trouble - like moving from G to C or D to A. Once you’ve pinpointed the tough spots, isolate those transitions and practice them repeatedly.
Try the two-minute loop technique: set a timer for two minutes and focus solely on one challenging chord change. This repetitive practice helps build muscle memory. Keep your fingers relaxed and close to the fretboard to avoid unnecessary movement. If two chords share a common finger position (like the ring finger in C and G), use that as an anchor to make the transition smoother.
It’s also helpful to practice with a metronome set to 60 BPM. Focus on the chord changes themselves before worrying about rhythm. Once you can switch chords smoothly at a slow tempo, gradually increase the speed. For beginners working on songs with 2–4 chords and basic strumming, consistent daily practice (15–30 minutes) over 3–7 days is usually enough to see improvement.
Start with Down-Strums
Don’t worry about fancy strumming patterns yet. Stick to the basics: four steady down-strums per measure, one on each quarter note. This simple rhythm allows your strumming hand to stay consistent while your fretting hand works on transitions.
"Slow chord changes can totally kill the rhythmic groove we've established with our strumming hand. The answer isn't simply 'just change chords faster.' Instead... start your chord changes earlier."
Here’s a pro tip: use the fourth down-strum as your "transition beat." On that beat, release the current chord and strum open strings as your fingers move to the next shape. To keep it sounding natural, focus the strum on the highest-pitched 3–4 strings. The most important thing is to land the new chord on the first beat of the next measure. Even if the transition isn’t perfect, hitting the downbeat matters more than a clean strum.
Once you’ve mastered these basics, you’ll be ready to tackle more complex strumming patterns with confidence. For now, keep it simple and steady - this is the foundation for everything to come.
Internalize and Film Your Performance
You’ve practiced the sections, smoothed out the chord transitions, and tackled those tricky spots. Now it’s time to take things to the next level: mastering the song. Recording yourself is an incredibly effective way to catch mistakes you might not notice while playing. It also confirms your progress and pinpoints areas that need a little extra attention. As Drew Haselhurst, Founder of Guitar Mammoth, explains:
"Playing starts with your ears. ... You need to internalize the sound so that when you come to play it, you'll know instantly if you're on the right track or not."
Memorize and Vocalize Riffs
Before you even pick up your guitar, spend time listening to the song repeatedly. Break it down mentally - figure out where the verses, choruses, and bridges fall. This mental mapping helps you anticipate chord changes and transitions as you play. Once you’ve got the structure down, try humming or singing along with the melody or riffs. Vocalizing them helps you lock in the rhythm and pitch, making it easier to translate the sounds onto your guitar.
When you feel ready, set aside your tabs. While tabs are helpful, they can become a crutch that keeps you from fully connecting with the piece. Playing without them forces you to rely on your ears, strengthens your muscle memory, and shifts your focus to your technique instead of the notes on the page. Think of it this way: a song isn’t fully learned until it’s memorized. That extra effort - what some call the final 20% - is what ensures you’ll retain the piece long-term. This step also lays the groundwork for analyzing your performance through recordings.
Once the song is firmly in your head and hands, it’s time to shift gears and start recording yourself.
Review Recorded Playthroughs
With the song internalized, use recordings to spot the finer details. Grab your smartphone and record videos of your practice sessions, making sure to capture both your hands and the audio. If you're looking to share these sessions on social media or YouTube, using professional video editing services can turn your raw footage into high-quality content that grows your audience and builds your brand, saving you hours of work each week. When you watch the playback, listen critically. Look for timing issues, missed notes, or awkward transitions that might have slipped past you while playing. These recordings can also highlight inefficient finger movements or poor hand placement that are hard to notice in real time.
Make this a regular part of your practice routine. Short recording sessions - 5 to 15 minutes at a time - are often more effective for building muscle memory than sporadic, lengthy practice marathons. Challenge yourself to perform full playthroughs without stopping for mistakes or glancing at tabs. This “no safety net” approach reveals exactly where your weak spots are and what still needs work. Over time, you’ll build a library of recordings that not only tracks your progress but also keeps you motivated by showing just how far you’ve come.
Conclusion
Mastering guitar songs quickly requires a smart, focused approach rather than endless hours of practice. The key lies in breaking songs into smaller sections, slowing down the tempo to match your skill level, and repeatedly working on challenging chord transitions until they feel natural. Pairing these techniques with regular playback practice and tracking your progress helps build both speed and accuracy over time.
Short, consistent practice sessions of 20–30 minutes are far more effective than sporadic, lengthy ones. By sticking to these six targeted methods, you can streamline your learning process and make noticeable progress, even with just a few minutes of practice each day. This structured approach not only improves your accuracy but also boosts your speed and consistency.
To make this journey even smoother, Riff Quest offers tools designed to optimize your practice. It allows you to log your sessions, track time spent on specific sections, and follow routines tailored to your skill level. With features like song difficulty ratings, skill-based analytics, and visual progress tracking, you’ll clearly see where you’re excelling and what areas need more attention. Best of all, it’s completely free - no subscriptions, no hidden costs.
Learn Songs Smarter, Not Harder
Stop struggling with slow progress. Use Riff Quest to track your song learning journey, hit your speed goals, and build a repertoire you're proud of.
Start Learning FreeFAQs
How do I choose which song section to learn first?
When you're learning a new song, it's smart to begin with the simplest parts - like repetitive sections or basic riffs. This approach helps you build momentum and gain confidence early on. Breaking the song into smaller, manageable pieces and focusing on parts that repeat frequently can speed up the learning process.
It’s also helpful to set clear goals. Start by mastering the broader elements, such as chord progressions or the overall structure, before diving into the more intricate details. This method keeps your practice organized and ensures steady progress without feeling overwhelming.
What should I do if I can’t increase tempo without making mistakes?
If you're finding it tough to speed up without making errors, take a step back and slow things down. Practice at a pace where you feel comfortable - say, around 60 bpm - and focus on getting every note right. Prioritize accuracy and proper technique over speed. Once you can play the section perfectly several times at this slower tempo, start increasing the speed bit by bit. This approach helps build muscle memory and precision, making it much easier to handle faster tempos down the line.
How can I tell if I’ve truly memorized a song?
You know you've truly memorized a song when you can play it flawlessly from memory without needing sheet music or tabs as a crutch. The real test? Consistency. If you can perform it confidently, without stumbling, and repeat it smoothly over time, you've got it down.