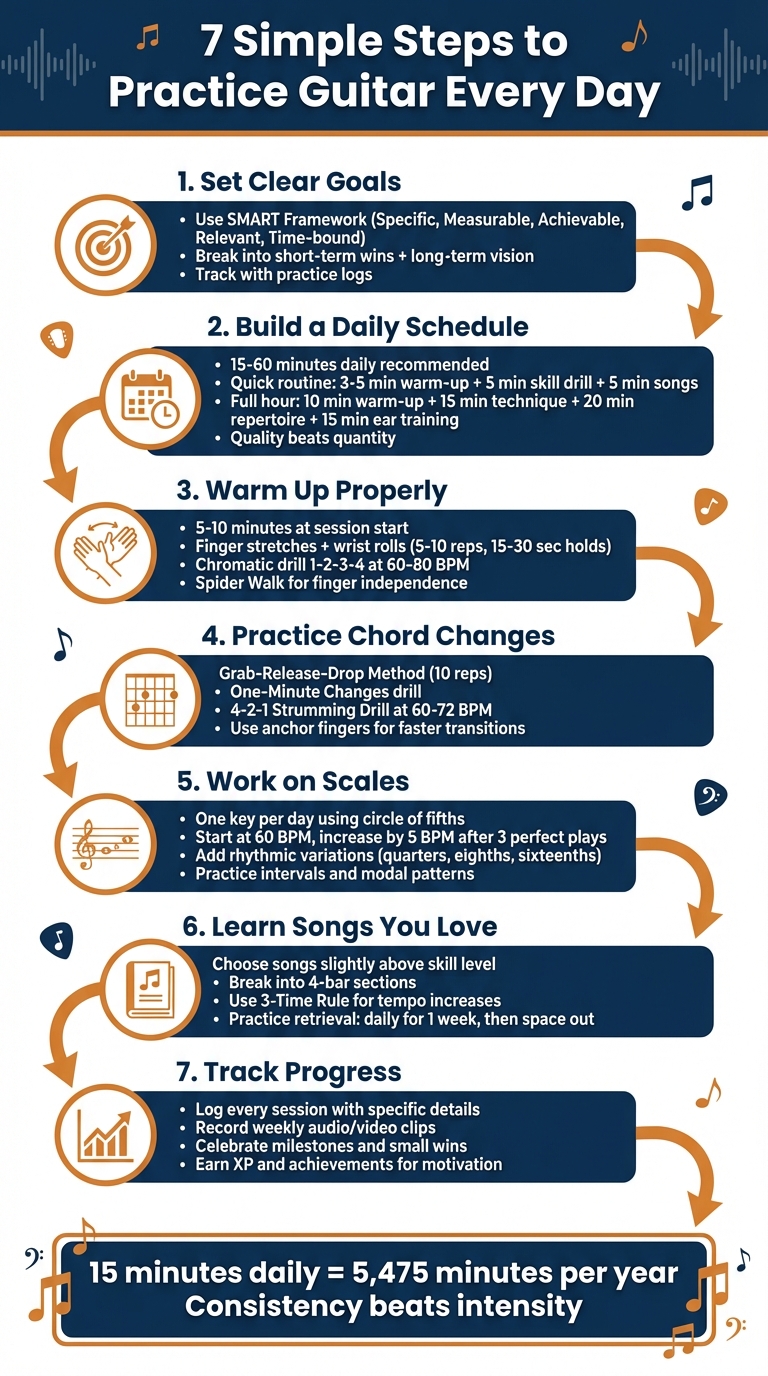
Practicing guitar daily doesn’t have to be overwhelming. In fact, short, focused sessions are far more effective than occasional long ones. This guide breaks down seven simple steps to make your practice routine consistent and productive:
- Set Clear Goals: Use the SMART framework to define specific, measurable, and realistic objectives.
- Build a Routine: Dedicate 15–60 minutes daily, dividing time between warm-ups, drills, and songs. New to this? Start with our guitar practice routine for beginners.
- Warm Up Properly: Stretch your fingers and wrists, then perform simple exercises to prepare for practice.
- Focus on Chord Changes: Practice smooth transitions and rhythm drills to improve timing and accuracy.
- Work on Scales: Build finger strength and agility by practicing scales with a metronome.
- Learn Songs You Love: Apply techniques to real music by breaking songs into manageable sections.
- Track Progress: Use practice logs or tools like Riff Quest to measure improvement and stay motivated.
Consistency is key - just 15 minutes a day adds up to over 5,000 minutes a year. Tools like Riff Quest can help structure your sessions and keep you motivated with gamified features. Start small, stay consistent, and watch your skills grow.
The ULTIMATE Guitar Practice Routine! (Do THIS Every Day)
Step 1: Set Clear and Realistic Goals
Having clear, specific goals is essential if you want your practice sessions to have purpose and direction. Without them, even the most dedicated efforts can feel scattered and unproductive, leaving you frustrated [8]. Goals act as a roadmap, turning your practice into measurable milestones that guide your progress.
Define Your Goals
Use the SMART Framework to shape your objectives. This means making your goals Specific, Measurable, Achievable, Relevant, and Time-bound [2]. For instance, instead of saying, "I want to improve my strumming", set a concrete goal like, "By Friday, I will master the down-up-down-up strumming pattern for 'Wonderwall' at 120 BPM" [2]. These types of goals give your practice a clear focus and help you track progress more effectively.
Break your goals into short-term wins and a long-term vision [8]. Short-term goals might include learning a specific chord progression or perfecting a tricky intro this week. Long-term goals, on the other hand, could be something bigger, like playing in a band or recording your first EP. This balance keeps you motivated with quick successes while staying aligned with your larger dreams. You can even integrate these goals into your daily schedule, as outlined in later steps.
Another useful method is to list the songs you want to master and identify the key techniques they require. This reverse-engineering approach ensures your practice directly supports your favorite music [5]. For example, if string bending is a recurring technique in the songs you love, it becomes a skill worth prioritizing in your daily sessions [5].
Track Goals with Practice Logs
Once you've set your goals, tracking your progress is the next step to turning your efforts into measurable achievements. Progress can often feel invisible, but keeping a practice log makes it tangible. Use the log to document what you worked on, what challenges you faced, and specific metrics like metronome speeds [3]. On tough days, looking back at your log can remind you of how far you’ve come [3].
Platforms like Riff Quest make this process even easier. Their practice logs allow you to track each session and build a visual record of your consistency. The platform also monitors your improvement across areas like Technique, Theory, and Ear Training, helping you spot both strengths and areas that need extra attention.
Consistency matters more than perfection. Aim to practice at least 75% of the days in a year - that’s a realistic goal that accounts for life’s inevitable interruptions [7]. To keep your momentum going, follow the 2-Day Rule: never skip more than two days in a row. This habit helps maintain muscle memory and keeps you progressing steadily [7]. By reviewing your log, you can identify patterns and ensure your practice stays on track for the long haul.
Step 2: Build a Daily Practice Schedule
Now that your goals are set, it’s time to create a practice routine that fits into your daily life. Practicing consistently - even just 15 minutes a day - can build muscle memory much better than trying to cram hours into a single weekend session [2].
Plan Your Practice Time
Aim to practice between 15 and 60 minutes daily, depending on your schedule and skill level. For busier days, stick to a quick 15-minute routine: spend 3–5 minutes warming up, 5 minutes on a specific skill drill, and the last 5 minutes playing songs you love. This keeps your habit intact without feeling overwhelming. If you can dedicate a full hour, break it down like this: 10 minutes for warm-ups, 15 minutes for technique work, 20 minutes on repertoire, and 15 minutes on ear training [2].
Remember, quality beats quantity. A focused 30-minute session with clear goals will do more for your progress than two hours of aimless playing [2]. To stay on track, use tools like a timer or metronome app to manage your time blocks. Concentrate on 3–4 specific skills during each session instead of spreading your focus too thin. Once you’ve nailed a particular skill, update your routine monthly with fresh challenges to keep improving and avoid stagnation. This structured approach ties directly back to the daily goals you set in Step 1.
Use Auto-Generated Routines
Feeling unsure about what to practice? That’s where Riff Quest’s auto-generated routines can save the day. These personalized plans take the guesswork out of structuring your sessions by tailoring practice schedules to your skill level and objectives.
Each routine strikes a balance between essential components - like warm-ups, technique drills, and applying skills to actual music. By following these ready-made plans, you can skip the planning phase and dive straight into productive practice, focusing your energy where it matters most: improving your skills.
Step 3: Warm Up with Stretches and Technique Exercises
Skipping warm-ups is like jumping straight into a sprint without stretching - your hands and wrists need preparation before diving into complex chords or fast solos. A proper warm-up boosts blood flow to your hands and wrists, helping to prevent stiffness and strain [12]. More importantly, it safeguards against repetitive strain injuries like tendonitis or carpal tunnel syndrome, which could sideline your playing for weeks or even months.
But it’s not just about avoiding injuries. Warming up refines your finger dexterity, coordination, and accuracy. It also helps you mentally transition from daily distractions to focused, purposeful practice [12]. As Adam Perlmutter, Editor of Acoustic Guitar, explains:
Just as a runner stretches before sprinting, a guitarist should warm up before delving into practice or performance [11].
Dedicate 5 to 10 minutes at the start of each session for warm-ups - it’s a small time investment that leads to smoother playing and long-term hand health. A consistent warm-up routine not only prevents injuries but also lays the foundation for effective practice. Start with mobility stretches and then move on to technical drills.
Start with Finger Stretches
Before you even pick up your guitar, ease into things with mobility exercises. Begin with finger fan-outs (5–10 repetitions), followed by 15-second wrist rolls in both directions [12].
Once your hands feel loose, move on to targeted stretches. Extend one arm with your palm facing up, and use your other hand to gently pull your fingers downward toward the floor. Hold this forearm stretch for about 30 seconds [10]. Then, flip your palm to face down and pull your fingers back toward your body, holding for 15 to 30 seconds [12]. These stretches prepare your muscles and tendons for the demands of playing. Just make sure to avoid deep stretches on "cold" muscles - start with light movement before static stretches [10].
Practice Basic Techniques
After stretching, activate your fingers with simple technique exercises. Start with the 1-2-3-4 chromatic drill: place your index finger on the first fret of the low E string, your middle finger on the second fret, your ring finger on the third, and your pinky on the fourth. Play each note cleanly, then move to the A string and repeat the pattern across all six strings [12][11]. Keep your metronome at a slow tempo - 60 to 80 BPM is ideal - and focus on clarity, ensuring every note rings out without fret buzz [12].
For an extra challenge, try the Spider Walk to improve finger independence. This pattern alternates fingers across strings: place your index finger on the E string, your pinky on the A string, your middle finger back on the E string, and your ring finger on the A string [12]. This drill trains each finger to work independently, which is essential for mastering complex passages. Paul Mehling, founder of the Hot Club of San Francisco, stresses:
The goal here is near-perfection - otherwise, you're just practicing mistakes [13].
Keep your fingers close to the fretboard to minimize unnecessary movement, and only increase your metronome speed by 5 BPM after you’ve played the exercise perfectly three times in a row [2].
Step 4: Practice Chord Changes and Rhythm Drills
Once you're warmed up, it's time to work on smooth chord transitions and consistent rhythm. These two elements are the backbone of playing guitar, and focusing on each separately can speed up your progress. Many beginners tend to fixate on finger placement, neglecting their strumming hand. But as Justin Sandercoe, founder of JustinGuitar, wisely notes:
The one thing worse than misplaying chords in a song is sloppy rhythm [15].
While a misplaced finger might go unnoticed, everyone can hear when your rhythm falters.
The trick is to practice each skill in isolation before combining them. Spend five minutes on chord changes, five minutes on rhythm drills, and then five minutes putting them together [22]. This method trains your brain to manage each part independently before tackling both at once.
Practice Chord Changes
Building muscle memory for chords isn't just about repetition. It's about teaching your fingers to locate the chord shapes from scratch, not just as part of a sequence. A great way to do this is the Grab-Release-Drop Method: form the chord, strum once, release your fingers completely, and let your arm drop. Repeat this process 10 times [14]. It might feel clunky at first, but it develops true muscle memory.
To improve transitions between two specific chords, try the One-Minute Changes drill. Set a timer for 60 seconds, count how many clean switches you can make (e.g., G to C), and track your progress daily [15][17]. You'll likely see improvement within a week. Once you're confident, move on to the 4-2-1 Strumming Drill: strum the first chord four times, then the second chord four times. Gradually reduce to two strums per chord, then one. Start at a tempo of 60–72 BPM and increase by 5 BPM as you master the transitions [2][18].
Pay attention to anchor fingers - these are fingers that stay in the same position during chord changes. For example, when transitioning from D to Cadd9, you can keep your ring finger in place while moving the others [16][20]. This small trick can make a big difference in speed and accuracy. Also, keep your fingers hovering close to the strings (about half an inch) to reduce unnecessary movement [17].
Once your chord changes feel solid, shift your focus to improving your strumming technique.
Work on Strumming Patterns
Your strumming hand deserves its own practice time. Start with muted string strumming by lightly resting your fretting hand on the strings to produce a muted "thud" sound. This isolates your strumming motion, helping you develop a natural, pendulum-like arm movement that stays consistent whether or not you're hitting the strings [19].
Begin with a simple pattern: four down-strums per bar (one on each beat: 1, 2, 3, 4). Once you're comfortable, practice strumming only on specific beats - like just beat 1, or beats 1 and 3 - while keeping your arm moving on the "silent" beats [19]. Tap your foot to the downbeats and count out loud ("1, 2, 3, 4") to stay in sync with the rhythm [19].
When combining chord changes with strumming, remember that rhythm is king. If you miss a chord, keep your strumming hand moving rather than stopping to adjust your fingers. Consistent rhythm is far more important than perfect chord placement [15][21].
Step 5: Practice Scales and Technical Patterns
After warming up and working through chord exercises, it’s time to dive into scales. Scale practice is a key step in building finger agility and improving your musical skills.
Scales are more than just repetitive exercises - they’re the foundation of music. They help you learn songs, solos, and riffs faster while developing muscle memory, finger strength, and coordination [23]. That said, scale practice shouldn’t feel robotic. As Justin Sandercoe wisely notes:
"It is ironic that we spend a lot of time learning scales and then spend a longer time making sure it doesn't sound like we are playing scales."
– Justin Sandercoe, Founder, JustinGuitar [24]
The goal is to make your scales sound fluid and musical. By focusing on specific keys, adding rhythmic variations, and exploring creative patterns, you’ll train your fingers to move effortlessly across the fretboard.
Choose One Key Per Day
Rather than jumping between scales at random, stick to one key each day. Use the circle of fifths to rotate through all 12 keys, ensuring you don’t limit yourself to familiar ones like G Major or A Minor. For instance, you could practice C Major on Monday, G Major on Tuesday, D Major on Wednesday, and so on. Plus, when you practice a Major scale, you’re also covering its relative minor - it’s the same set of notes but with a different starting point.
Start slow with a metronome set at 60 BPM. Apply the 3-Time Rule: only increase the tempo by 5 BPM after you’ve played the scale perfectly three times in a row [2]. This method ensures accuracy and consistency as you build speed.
Once you’ve chosen your key, mix things up with rhythmic and modal variations.
Add Rhythms and Modes
After memorizing a scale pattern, make your practice more dynamic by experimenting with rhythms. Begin with quarter notes, then shift to eighth and sixteenth notes to improve your timing, speed, and precision. To break away from the usual up-and-down routine, try playing the scale in intervals, such as thirds or fourths, for a more melodic feel. Randomly changing directions within the scale can also boost your fretboard agility.
For an added challenge, play with metronome displacement. Set your metronome to half-speed and treat the clicks as beats 2 and 4. This technique sharpens your internal rhythm and keeps practice sessions engaging.
Step 6: Learn Songs and Build Repertoire
Once you've spent time working on scales and technique exercises, it's time to put those skills to use by learning songs. Songs provide a practical way to apply techniques like scales, licks, and chord changes in a musical setting. Plus, learning a song you love from start to finish is incredibly rewarding and keeps you motivated to practice.
When you analyze a song's TAB, it acts as a guide to pinpoint the skills you'll need, such as bends, vibrato, or barre chords. Playing sections of a song at full tempo also strengthens muscle memory in ways slow exercises can’t. As TheGuitarLesson.com explains:
"Learning songs you love and connect with is what keeps students motivated to continue learning and advancing. Plus, it is a natural way to learn new techniques, theory, and the whole shebang."
– TheGuitarLesson.com [9]
The trick is to balance technical drills with learning songs. Overloading on exercises can make practice feel like a chore, while focusing only on songs might cause you to hit a plateau. Start by choosing songs that match your skill level, and break them into smaller, manageable chunks.
Select Songs by Difficulty
Pick songs you genuinely enjoy - your enthusiasm will push you through challenging sections. Look for material that’s just slightly above your current skill level to encourage growth without becoming frustrating. For instance, if you’re working on barre chords, find a song that incorporates them so you can practice the technique in a meaningful way.
Tools like Riff Quest’s song library make this process easier by offering difficulty ratings. You can filter by skill level to find songs that align with where you are in your journey. Whether you're preparing a "memory song" set for casual performances, an "open mic" set for live gigs, or a "10-song set" for band rehearsals, having clear goals makes it easier to pick the right songs.
Setting a deadline can also help you stay on track. Choose a target date, note it in your practice tracker, and plan your practice sessions accordingly. Once you’ve selected a song, the next step is to break it down into its chord progressions.
Break Down Chord Progressions
Resist the temptation to play the entire song immediately. Instead, break it into smaller sections - around four bars at a time - and focus on mastering each part before moving on. This approach connects your earlier technical practice to your overall routine while keeping the process manageable.
Before diving in, listen to the song several times to understand its structure (e.g., Intro, Verse, Chorus, Bridge). Print out the lyrics and chords together so you can see how they align. Identify tricky transitions or chord changes, and loop those sections slowly with a metronome. Use the 3-Time Rule: only increase the tempo by 5 BPM after playing the section perfectly three times in a row [2].
Transitions between sections are often the hardest part of a song, so practice these separately until they’re smooth. Gradually piece the sections together, and consider recording yourself to catch any timing issues or rough spots.
To lock the song into long-term memory, practice "retrieval." Play the song once daily for a week, then reduce the frequency to every few days. This spaced repetition strengthens neural connections, ensuring the song stays with you for the long haul.
Step 7: Track Progress and Stay Motivated
Once you've set clear goals and established a consistent practice routine, the next step is tracking your progress. Why? Because seeing measurable improvement keeps you motivated. Without a way to log your efforts, it’s easy to feel stuck - especially when you’ve reached a level where daily gains are less obvious [25]. By documenting what you practice - whether it’s “A minor pentatonic at 100 BPM” or “nailed the bridge in Wonderwall” - you create tangible evidence of your growth.
Riff Quest makes this process simple. Its practice logs allow you to track every session, helping you pinpoint areas that need more focus. On top of that, the platform provides skill-specific analytics in categories like Technique, Theory, and Ear Training. This gives you a clear overview of your progress and ensures your practice remains balanced [6]. As Riff Quest aptly puts it:
Motivation comes from seeing results [6].
Log Practice Sessions
When you log your sessions in Riff Quest, you create an objective feedback system that ensures your practice time is effective. The platform's activity heatmap visually tracks your daily consistency, letting you identify patterns and stick to habits - without the added pressure of maintaining a streak [6].
Another great idea? Record a short audio or video clip each week. These clips make it easy to track your progress over time. When you feel like you’ve hit a plateau, reviewing these recordings will remind you just how far you’ve come [1]. This approach strengthens the routines you’ve built and keeps you motivated to push forward.
Celebrate Milestones
Tracking progress is only half the story - celebrating it is just as important. Acknowledging small wins boosts your confidence and reinforces your commitment to practice [8]. Travis Osterloh, founder of Osterloh Guitar Academy, emphasizes this idea:
Celebrating small victories releases dopamine and makes you want to keep going [8].
Instead of focusing solely on how far you still have to go, take time to appreciate the distance you’ve already covered.
Riff Quest makes celebrating progress easy with its gamified rewards system. You earn XP (experience points) for every minute of practice, level up your skills, and unlock achievements like "Elite Master" or "Diamond Pick" [6]. These rewards not only mark your progress but also keep you motivated during those tougher learning phases. Plus, with a community of over 600 guitarists using Riff Quest to turn practice into progress, you’re in good company. Best of all, the platform is completely free - no hidden fees or locked features [6].
Your progress deserves to be seen
Don't just practice, improve. Use Riff Quest to track every session, celebrate every win, and stay motivated on your journey to mastery.
Start Tracking FreeConclusion
By following the seven steps outlined, your daily practice routine can become both manageable and effective. These steps act as a roadmap, shifting you from aimless playing to intentional skill development[2]. Setting clear goals and sticking to a schedule provide structure, while warming up, working on techniques, and learning songs transform each session into meaningful progress. Tracking your achievements ensures you stay motivated, even when the results aren’t immediately obvious.
The secret lies in consistency, not intensity. As Fretboard Logic wisely states:
15 minutes a day is more effective than 7 hours once a week[2].
Over a year, those 15 minutes add up to 5,475 minutes of focused practice[4] - enough to build muscle memory and see real improvements. A deliberate 30-minute session will always outshine a distracted two-hour one.
Riff Quest simplifies this journey by breaking your practice time into focused blocks - Warm-Up, Technique, Repertoire, and Theory. The platform also offers tools like practice logs, visual progress tracking, and skill-specific analytics to provide clear feedback on your growth. Gamified elements, like XP and achievements, make the process enjoyable and rewarding[6]. And the best part? Riff Quest is completely free - no subscriptions, no hidden costs, no locked features[6]. Whether you’re a beginner or honing advanced skills, it gives you everything you need to turn practice into tangible progress.
With Riff Quest as your guide, every practice session becomes a step toward mastery. Show up consistently, stick to the routine, and let the results speak for themselves. As Steve Vai advises:
Get clear about your goals. Create a vivid and exciting picture in your mind of where you want to be and let that guide you[4].
FAQs
What should I practice if I only have 15 minutes?
If you’ve only got 15 minutes to practice guitar, make every second count with a focused plan. Start with a quick warm-up to get your fingers moving - this could be simple finger exercises or a few scales. Then, dedicate a few minutes to practicing chord changes or specific scales that challenge you. Use the rest of your time to work on strumming patterns or riffs, preferably with a metronome to keep your timing sharp. A routine like this packs a lot of progress into a short session.
How do I know when to speed up with a metronome?
Start practicing at a slow tempo - around 60 BPM is a good starting point. Focus on playing the exercise perfectly three times in a row before increasing the speed. Once you're comfortable, raise the metronome by 5 to 10 BPM and repeat the process. This gradual method helps you nail accuracy before picking up the pace, setting the foundation for steady and productive practice habits.
How can I stay consistent when I miss a day?
If you skip a day, don't stress about it - just jump back in where you left off. The key is to stick with a routine that’s easy to maintain, even if it’s only 10-15 minutes a day. Be open to tweaking your schedule to keep things workable. What truly matters is staying consistent over time, not achieving perfection every single day. Keep your momentum going and don’t let small setbacks derail your progress.